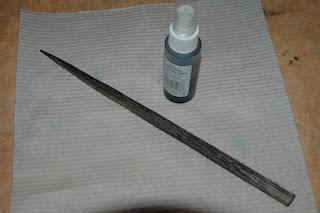
I cut about a 12" piece of each of the Balsa and Basswood 1/2" square sticks I bought (Pine to come later).
I used a nice sized handle razor knife I like because it fits my hand and I have decent control. You can use a exacto knife or whatever you are most comfortable with. I sure hope I don't have to say always cut away from yourself.......
 I started with the base, just trying to get it mostly round. Did not take too long to get a good feel just the angle to hold the knife to shave off just a little.once the base 3" or so was rounded I turned the stick around and it was time to work on the pointy end. As I "whittled" away I accidentally went in a bit deep a few times or had a bigger hunk come out than planned. No issue when this happens as there is no tree that is perfect, and each oops adds character and realism.
 Once I got the rough shape to where I wanted it is time to add the bark look. I read about using a wire brush, dremel, rasp, etc to mar the trunk. With some of these either not available at that moment or me not thinking it would work the way I wanted I went to a saw. The technique is to drag the stick across the teeth at a 90degree angle to the normal cutting usage. Scraping groves down the length of the trunk. Starting with lighter pressure, and increasing until you get the grove depths you want.
I started with a fine tooth saw. not exactly what I was looking for, so I moved to a cross cut hand saw. Again, not quite what I wanted. So on to a rip saw. Finally with the use of all 3 got the look I was looking for. Nice groves some shallow, some deeper. Once that was done the trunks had lots of wood scrapings hanging on. More than I wanted so I took 100grit sand paper and lightly sanded the trunk to take off most of the bits without losing the texture.
 Next step is to color the trunk. I again hope I don't have to say don't do this in your living room, as the india ink overspray will cost you a bunch, and this is exactly what we are trying to avoid.
 I mixed 2 teaspoons of india ink into a pint of rubbing alcohol making a grey wash. I poured that into a small spritzer. I coated the first trunk (over cardboard in the garage with the wife's car backed out) until I could see the grooves darker than the outer "bark." I knew it would dry a little lighter than I had and it would be easy to coat it more if I didn't like the color.

After it dried I did think it looked too grey for the look I wanted but deferred to the ones that went before me.
They were right, once the branches were attached it looked pretty good. The green of the branches/needles had the grey looking more brown that what I initially saw.
I then started on the second trunk this time with the basswood. There was not that much difference in handling, carving, or coloring so I would suggest you start your own with the one you can get at a lower cost. The other item I changed was I also wanted to make a Red Pine. This pine has a more red bark so I lightly applied a dark oak stain on the trunk after I had colored it with the grey wash. I attempted to minimize getting the stain into the groves (leaving them a dark grey), and just color the outer layers of the bark. I used a paper towel with a little stain on it. Almost using a dry brushing technique with the stain. The red pine will be the second tree I attempt.
 Basically I am saying to not be afraid of experimenting or making a mistake. Sometimes these make the best scenery for your layout. To the right are the 2 trunks so you can see the differences between the stained and non-stained trunks.
After taking this picture I took a piece of deck board (5/4 x 6 x about a foot) and drilled a couple 1/2" holes mostly through to provide a nice firm holding base so I could pause without damage.
Next step, making branches.


No comments:
Post a Comment