Even trying to pull these together I discovered some more links I want to read/watch. Remember google is your friend.
Here are some of the sources I have run into:
Online Magazines:
http://trn.trains.com/
http://modelrailroader.com/
http://model-railroad-hobbyist.com/
Online videos on http://youtube.com/ search for:
- Miniatur Wunderland Hamburg
- model railroad
- model railroad scenery
DVD:
- Series from John Fugate (on sale at http://model-trains-video.com/deal.php)
- Dream, Plan, Build series
Sources for stuff:
Home Depot/Lowes - Plaster of Paris, wood, spray paint, stain
Grocery store - baking soda, parifin wax
Hobby supply store -
Wallmart/Target - white glue,masking tape, paint,
Tuesday, February 28, 2012
Monday, February 27, 2012
Plaster of Paris (PoP) stuff
Not sure about you, but in the little modeling I have done so far I have went through quite a bit of PoP. Buying it from the hobby store in smaller quantities is very expensive. Going to a Michaels is only a little better. What I found is the local home improvement big box store is a real good choice. I was able to get 4 times the quantity for a little more than what I had paid prior.
Tip for using PoP - dry times are quick (usable time about 5 min) so make small batches or you will be scraping out your mixing bowl/bucket a bunch. If you add 1 teaspoon of a cheap baking soda to the dry mix prior to water the cure time is increased to about 30 min. A small side effect is the texture of the plaster does change a little which is not necessarily a bad thing, think of it as another way to add a different texture to your plaster work.
Another way to add another texture is to mix in play sand (another big box low price item) into the mixture. roughens up the texture a bit. I would suggest you try it to see if that is the texture you desire.
If you like hydrocal know that is a different texture and color than any of the plaster basic mixes. Even after drying it takes coloration differently as it seems to be less porous than straight plaster so stays more whitish.
Another big box store item that might work out for you is to get a bag of pine tree bark ground cover. The large chunks that is. if you carve them to fit to your hill they can look like a nice rock out cropping. All you have to do is glue down and paint.
More tips and tricks I have found on-line or from experience to come.
Thursday, February 23, 2012
Lodgepole Pine part 4 - Time to branch out
Got all the base work done. One more thing to prep - I took a short deck board (heavy enough to be stable) I had and drilled 1/2" holes (size of the trunk) most of the way through (allowing me to pick up the board without the trees slipping through). This allowed me to put the tree into the holder at any time and not have to worry about breaking off branches.

The split is not a bad thing if you take it easy as you can put a couple branches right at the top with the split. Another oops to my advantage.....
 So the basic process is to stick the pick slightly into the trunk and wiggle it a little to make a depression for the branch to come.
More scenery tips next posting.

There are two methods people I read about used. Top down or bottom up. After doing it once I prefer the top down method. I also prefer the dental pick over a drill as the branches I am inserting various diameter branches and did not want to fight that.
To glue the branches to the trunk I am using "super glue" because it sets quickly.
I started with the grey trunk and took the dental pick and pressed into the trunk near the top of the tree. I quickly found out it is quite easy to split the trunk. After pulling out the needle out of my finger and doing a bandaid run, I decided to use less pressure near the top of the tree and not put my finger directly behind the stick.
The split is not a bad thing if you take it easy as you can put a couple branches right at the top with the split. Another oops to my advantage.....
 So the basic process is to stick the pick slightly into the trunk and wiggle it a little to make a depression for the branch to come.
Next step is to pick a branch about the right length. If a little long I trimmed it to the length I needed. I gently held the branch and dipped the cut end into the CA. Then positioned the branches (location and angles) holding still for 10 sec. If the branch is still loose, I repeated the process. I rotated the trunk to a spot that looked like it needed a branch and repeated the process.
The finding locations to put branches and what length/fullness are much easier if you have multiple pics of the type of tree you want to make.
One goal I wanted is to have a small stand of these trees with the track going between the trunks (branches above the train cars).
Wednesday, February 22, 2012
Lodgepole Pines part 3 - Getting Needled

 Toughest part of this is getting good material to work with. One source that was recommended was Michaels. The first bunch of dried caspia basil fern I found was nothing more than green sticks with a large bunch of busted up stuff in the bottom. I found another bunch that was better, but that is only in comparison to the first one. Give them credit I got 50% off because of the poor quality. Later I discovered the local floral place would sell me some of the caspia they had. Got nicer stuff and about the same number of good branches for the same price of $3. Add to that the floral place sprayed the caspia Moss Green which is a pretty close match to what I was looking for. Plus it covered any undesired coloration.
 Now to prepare to make the branches:

Once set it was time to cut branches. Since I was going to need lengths ranging from 1/3" to 3" for the size tree I wanted. After cutting a few I started dipping the branch end into the glue, allowing it to drip off a little, then into the foam. I knocked off extra foam by holding the branch and tapping that hand with a finger from the other. This way I was not knocking the branch directly preserving it a little.
Once foamed, I set them on the wax paper foam up.
 I couple tips -
1. you do not have to completely soak the branch in glue, just the ends where you want foam (simulated pine needles).
2. If you do not like the look of the medium foam, try the fine.
3. find a color of spray paint for the branches that works with the type of tree you are working on and use it allowing plenty of dry time.
4. cut the branches longer than you really need. you can always cut them down for a specific spot.
5. don't be affraid to use both fine and medium foam, or 2 colors.
Next step is to assemble the tree.
Tuesday, February 21, 2012
Making a lodgepole pine part 2 - Trunk Time
Today I will talk about what I did to make the trunks.
I cut about a 12" piece of each of the Balsa and Basswood 1/2" square sticks I bought (Pine to come later).
I used a nice sized handle razor knife I like because it fits my hand and I have decent control. You can use a exacto knife or whatever you are most comfortable with. I sure hope I don't have to say always cut away from yourself.......
 I started with the base, just trying to get it mostly round. Did not take too long to get a good feel just the angle to hold the knife to shave off just a little.once the base 3" or so was rounded I turned the stick around and it was time to work on the pointy end. As I "whittled" away I accidentally went in a bit deep a few times or had a bigger hunk come out than planned. No issue when this happens as there is no tree that is perfect, and each oops adds character and realism.
Once I got the rough shape to where I wanted it is time to add the bark look. I read about using a wire brush, dremel, rasp, etc to mar the trunk. With some of these either not available at that moment or me not thinking it would work the way I wanted I went to a saw. The technique is to drag the stick across the teeth at a 90degree angle to the normal cutting usage. Scraping groves down the length of the trunk. Starting with lighter pressure, and increasing until you get the grove depths you want.
 I started with a fine tooth saw. not exactly what I was looking for, so I moved to a cross cut hand saw. Again, not quite what I wanted. So on to a rip saw. Finally with the use of all 3 got the look I was looking for. Nice groves some shallow, some deeper. Once that was done the trunks had lots of wood scrapings hanging on. More than I wanted so I took 100grit sand paper and lightly sanded the trunk to take off most of the bits without losing the texture.
 Next step is to color the trunk. I again hope I don't have to say don't do this in your living room, as the india ink overspray will cost you a bunch, and this is exactly what we are trying to avoid.
I mixed 2 teaspoons of india ink into a pint of rubbing alcohol making a grey wash. I poured that into a small spritzer. I coated the first trunk (over cardboard in the garage with the wife's car backed out) until I could see the grooves darker than the outer "bark." I knew it would dry a little lighter than I had and it would be easy to coat it more if I didn't like the color.
After it dried I did think it looked too grey for the look I wanted but deferred to the ones that went before me.
They were right, once the branches were attached it looked pretty good. The green of the branches/needles had the grey looking more brown that what I initially saw.
 I then started on the second trunk this time with the basswood. There was not that much difference in handling, carving, or coloring so I would suggest you start your own with the one you can get at a lower cost. The other item I changed was I also wanted to make a Red Pine. This pine has a more red bark so I lightly applied a dark oak stain on the trunk after I had colored it with the grey wash. I attempted to minimize getting the stain into the groves (leaving them a dark grey), and just color the outer layers of the bark. I used a paper towel with a little stain on it. Almost using a dry brushing technique with the stain. The red pine will be the second tree I attempt.
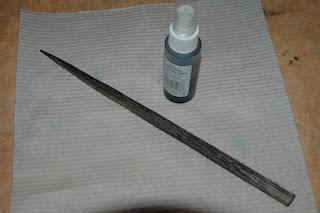
 Basically I am saying to not be afraid of experimenting or making a mistake. Sometimes these make the best scenery for your layout. To the right are the 2 trunks so you can see the differences between the stained and non-stained trunks.
After taking this picture I took a piece of deck board (5/4 x 6 x about a foot) and drilled a couple 1/2" holes mostly through to provide a nice firm holding base so I could pause without damage.
Next step, making branches.
I cut about a 12" piece of each of the Balsa and Basswood 1/2" square sticks I bought (Pine to come later).
I used a nice sized handle razor knife I like because it fits my hand and I have decent control. You can use a exacto knife or whatever you are most comfortable with. I sure hope I don't have to say always cut away from yourself.......
 I started with the base, just trying to get it mostly round. Did not take too long to get a good feel just the angle to hold the knife to shave off just a little.once the base 3" or so was rounded I turned the stick around and it was time to work on the pointy end. As I "whittled" away I accidentally went in a bit deep a few times or had a bigger hunk come out than planned. No issue when this happens as there is no tree that is perfect, and each oops adds character and realism.
 Once I got the rough shape to where I wanted it is time to add the bark look. I read about using a wire brush, dremel, rasp, etc to mar the trunk. With some of these either not available at that moment or me not thinking it would work the way I wanted I went to a saw. The technique is to drag the stick across the teeth at a 90degree angle to the normal cutting usage. Scraping groves down the length of the trunk. Starting with lighter pressure, and increasing until you get the grove depths you want.

 Next step is to color the trunk. I again hope I don't have to say don't do this in your living room, as the india ink overspray will cost you a bunch, and this is exactly what we are trying to avoid.
 I mixed 2 teaspoons of india ink into a pint of rubbing alcohol making a grey wash. I poured that into a small spritzer. I coated the first trunk (over cardboard in the garage with the wife's car backed out) until I could see the grooves darker than the outer "bark." I knew it would dry a little lighter than I had and it would be easy to coat it more if I didn't like the color.

After it dried I did think it looked too grey for the look I wanted but deferred to the ones that went before me.
They were right, once the branches were attached it looked pretty good. The green of the branches/needles had the grey looking more brown that what I initially saw.

 Basically I am saying to not be afraid of experimenting or making a mistake. Sometimes these make the best scenery for your layout. To the right are the 2 trunks so you can see the differences between the stained and non-stained trunks.
After taking this picture I took a piece of deck board (5/4 x 6 x about a foot) and drilled a couple 1/2" holes mostly through to provide a nice firm holding base so I could pause without damage.
Next step, making branches.
Monday, February 20, 2012
Making a Lodgepole Pine tree in HO scale - Part 1
A little while ago I saw a picture of a train rolling through a stand of lodge-pole pines. Right there and then I knew I needed a bunch, and after finding the price of good ones set at $25 - 75 it was easy to figure out I needed to win the lottery or work out how to make them.
After doing a bunch of research (Google is your friend) I started to assemble multiple ways to make these trees. So I will start trying these techniques and document the process and successes/challenges here.
First I am working in HO scale (1:87) and wanted a tree over 80' tall. This works out to about a foot tall. Scale has the trunk about 1/2" in diameter.
1. raw materials - wood - I initially bought 1 each of the following 3 options
- 1/2" square balsa wood (came in 2' lengths)
- 1/2" square base wood (also came in 2' lengths)
- 1/2" pine dowel (3' length)
 2. raw materials - caspia basil fern - dried
- Michiels - What I found at the one closest was real dry and real beat up. I got a pretty nice discount so I bought one bundle.
 - Local flower shop - WOW much better quality. Bought a few sprigs.
 3. other items needed:
- rubbing alcohol
- india ink
- spritzer
- white glue
- 2 sealable low priced rubermades (I chose 3"x5"x3")
- ground foam
- Spray paint (medium dark flat green)
- super glue
- dark oak stain
4. other items needed
- small cutter (I used an electronic sized diagonal cutter)
- dental probe (needle on a stick, I prefer over a small drill)
- wax paper to dry glued or stained items
- water to dilute the white glue
- wood block to hold tree trunk when in process
- razor knife
 Next posting is making a trunk.
After doing a bunch of research (Google is your friend) I started to assemble multiple ways to make these trees. So I will start trying these techniques and document the process and successes/challenges here.
First I am working in HO scale (1:87) and wanted a tree over 80' tall. This works out to about a foot tall. Scale has the trunk about 1/2" in diameter.
1. raw materials - wood - I initially bought 1 each of the following 3 options
- 1/2" square balsa wood (came in 2' lengths)
- 1/2" square base wood (also came in 2' lengths)
- 1/2" pine dowel (3' length)

- Michiels - What I found at the one closest was real dry and real beat up. I got a pretty nice discount so I bought one bundle.


- rubbing alcohol
- india ink
- spritzer
- white glue
- 2 sealable low priced rubermades (I chose 3"x5"x3")
- ground foam
- Spray paint (medium dark flat green)
- super glue
- dark oak stain
4. other items needed
- small cutter (I used an electronic sized diagonal cutter)
- dental probe (needle on a stick, I prefer over a small drill)
- wax paper to dry glued or stained items
- water to dilute the white glue
- wood block to hold tree trunk when in process
- razor knife

Introduction to the Blog
General subject matter of this blog will be what Steve and I do to create our model railroad. I will list several locations on the net where we are posting pics of what we have worked on.
Steve got the OK from his better half (always a very good idea) to convert one basement room into a layout. It is a L shaped room about 16' on a long side. If we stretch out all the sides it would go about 60'
We are both movie buffs so we decided putting in pieces of some of our favorite movies. e.g. The Princess Bride. We are naming the end helixs Mount Gilder and Mount Floren (and yes there will be a cliffs of insanity).
As of today we have the base bench work completed using a L-girder method. We have set and removed several roadbed types. Not sure what the final will be, but.......
I will also talk about how I take pics of the various parts of the layouts - what technique I used to take a shot of.....
One of the biggest items we have run into, and probably one most modelers do, is cost to buy everything pre-built. I will cover several techniques I have or will try to make various trees, buildings, scenery items, other various items that can help minimize costs.
One item I want to cover here is I have done hours of research online, watches lots of how to videos, and talked to many people who have been working on their layouts. I am not directly copying anyone's material more of my combining all the gleaned wisdom and experience and my own and summarizing here. I will post some of the many sources (ones I can remember) in a post shortly.
Feel free to use any and all I post in your layout, and if you do write something and do remember me as a source a quick reference would be appreciated.
Subscribe to:
Posts (Atom)