First thing to do when you awant to create a layout is to plan. I would suggest you start with an outline. Items to have on the list incude scale and track code (we chose HO scale and code 100 track), era to model (we chose the 60s) as this will change the scenery and rolling stock you can or should not use. Also to add to the list are items you want to have in the layout (e.g. large city, or mountain).
Additional things to decide prior to hammering the first nail:
- What type of benchwork to use
- Frontal legs on the benchwork or braced
- single or multiple levels
- width of shelfs
- to DCC or not to DCC
- how to power the entire layout
- any special options (e.g. Fahler cars that also move)
- Doing any lighting effects (sunset, night)

We decided on having 2 levels, the lower for a rail yard to stoe trains, and the upper for show.
We stup helixes on each end to lift the trains from level to level. Like everyone olse we will turn these into mountain tops. We are looking at putting 2 cities, a large one in the middle and a smaller one near one end.
There are a bunch of layout pics we looked at that had ideas we liked. So we worked at getting a decent flow as we moved around the layout.
We are both movie buffs with "The Princess Bride" as one of our favorites. So we decided to insert movie pieces into the layout. Fun for us and a task for viewers tofind as many movie references as they can find.
The ends of the lines are Gilder and Floren (countries from the Princess Bride). The main city is Hilldale and the town is Bedford Falls. Thre will be many more movie bits inserted.
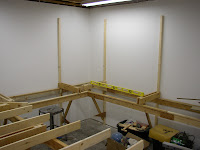
L-Girder installation was pretty easy. We had decided in a braced front so there would not be any legs to stub our toes upon. Se started with 1x2 furring strips on the wall then angled brace and top joist we leveled and set a level line down the wall so every one would be at the same altitude. A laser level really helped this process. They are not to expensive or your neighbor might have one you can borrow for a couple hours. We capped each one of these with a 1x2 forming an L or more accurately looks liek a 7 (use for this top horizontal piece will be seen shortly). We added the front "7" and a diagonal support as seen above. The advantage is we would not have any legs needed on the front of the bench work. We took our time making sure everything was level regardless of from where to where we checked. We worked with a standard shelf width of 20" with expansion to 36"x48" for each helix.

Once the initial front/back braces were set we laid down the 1x4 joists spacing them 24" apart as the default.
Pretty quickly we had what looked like a long wrap around shelf in the making.
I do suggest you read all the posts on bench work prior to starting yours. You might see something in a latter posting that will make you slap you head saying "DOH!" if you don't.
Next post will be finishing the lower bench work and adding the upper level.


No comments:
Post a Comment